E21 | Full Sun Garden, Floor Patch | Ask This Old House
Season 21 Episode 21 | 23m 42sVideo has Closed Captions
Jenn plants a garden; Mark cleans hardscaping; Tom patches a wood floor.
Jenn Nawada helps a homeowner create a thoughtful backyard entrance by transforming a sun-dried side yard into a full sun garden; Mark McCullough shares how to safely clean hardscaping on different types of common hardscape materials; Tom Silva shows a homeowner step-by-step how to patch holes in his wood floors caused by previously removed radiators.
Problems with Closed Captions? Closed Captioning Feedback
Problems with Closed Captions? Closed Captioning Feedback
Funding for THIS OLD HOUSE is provided by The Home Depot and Renewal By Andersen.
Support provided by:

E21 | Full Sun Garden, Floor Patch | Ask This Old House
Season 21 Episode 21 | 23m 42sVideo has Closed Captions
Jenn Nawada helps a homeowner create a thoughtful backyard entrance by transforming a sun-dried side yard into a full sun garden; Mark McCullough shares how to safely clean hardscaping on different types of common hardscape materials; Tom Silva shows a homeowner step-by-step how to patch holes in his wood floors caused by previously removed radiators.
Problems with Closed Captions? Closed Captioning Feedback
How to Watch Ask This Old House
Ask This Old House is available to stream on pbs.org and the free PBS App, available on iPhone, Apple TV, Android TV, Android smartphones, Amazon Fire TV, Amazon Fire Tablet, Roku, Samsung Smart TV, and Vizio.
Keep Exploring


This Old House Insider Newsletter
Get This Old House exclusive stories, tips, and behind-the-scenes information delivered right to your inbox every month.Providing Support for PBS.org
Learn Moreabout PBS online sponsorshipKevin: On "Ask This Old House," our experts travel across the country to answer questions about your house.
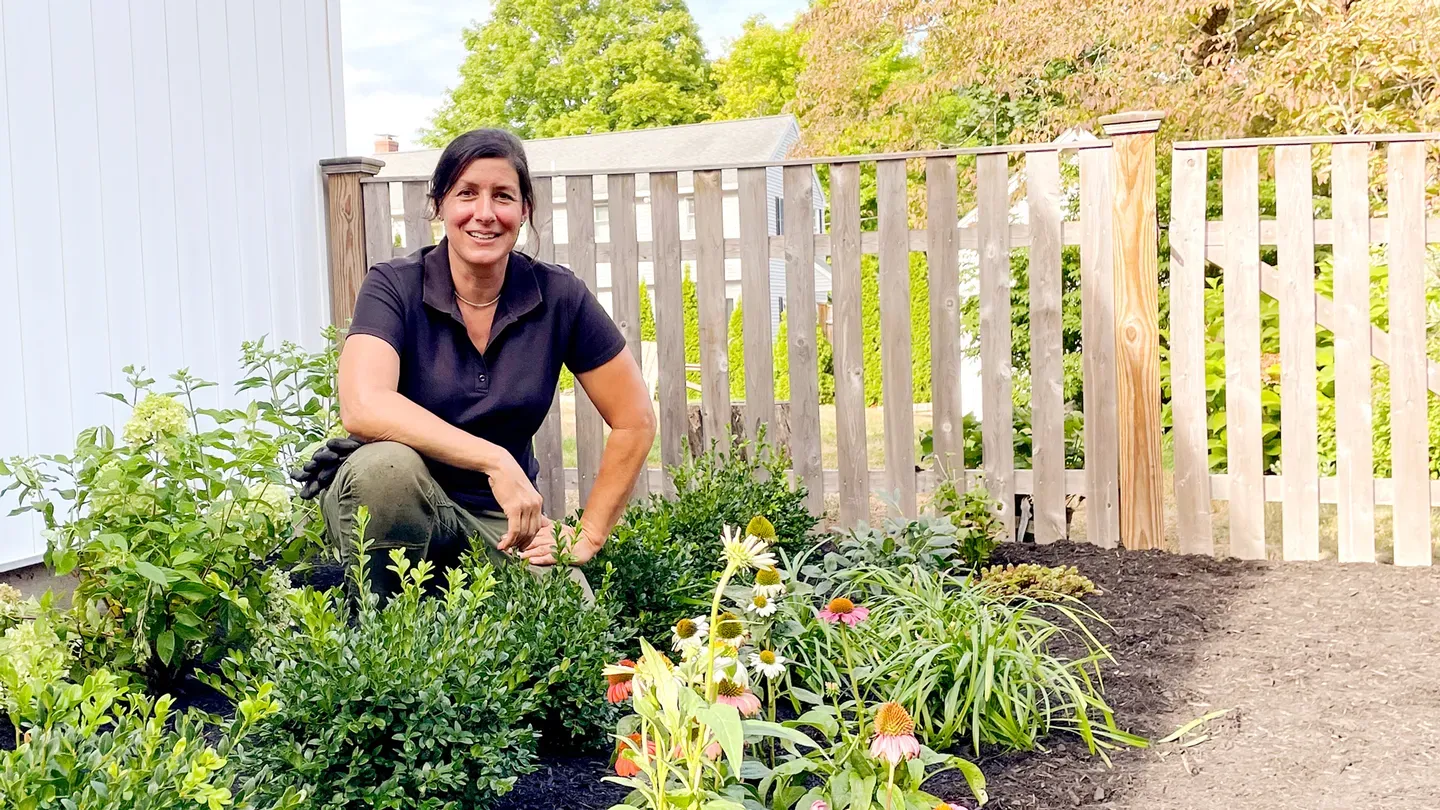
♪ Kevin: Today, Jenn transforms a sun-damaged yard into a sun-loving garden.
Then Mark will show you how to clean different types of stone surfaces to help spruce up your yard this spring.
And have you ever removed a radiator but struggled with patching the floor?
Well, Tommy will show you how.
It's all coming up next on "Ask This Old House."
Hi, Heather.
Hiya, Jenn!
So excited you're here.
Yeah, it's so nice to be at your lovely home.
I love your Japanese maple, your hydrangeas.
Thank you.
Yeah, it's a bit of a work in progress.
We've been here about six years.
We thought it was going to be our starter home but have since fallen in love with our neighbors.
All my kids' friends live back here, so I think we're sticking around.
You have to.
You cannot leave good friends.
Yeah!
That's what it's all about.
Oh, it's so true.
Not guaranteed.
Jenn: Absolutely not.
So this is the area?
This is the area.
If you arrive to our house in the spring or summer or fall, really, this tends to be the primary entrance.
It's really the secondary entrance to our home...
I mean, this backyard is amazing.
The treehouse, a nice level playing lawn.
I mean, drought aside, it's pretty awesome.
So you really want to guide everyone through.
Yeah, we'd love a more hospitable entrance here.
Mm-hmm.
I think we could do something.
So what are you thinking?
What kind of vibe are you going for?
So we'd love, like, a layered look here.
We would love some evergreen here that doesn't die in the winter and then lots of perennials that bloom kind of seasonally, so we always have some color.
Yeah, so the shrubs will give it structure in the winter, and then the perennials will die down, but we could pick something that blooms spring, summer, and fall.
Exactly.
Awesome.
So, I've brought a few things for you to look at in the truck to see if you want to put them in.
Awesome.
Let's check it out.
OK.
So your area is full sun, and so I had to pick full-sun plants.
Ooh, I love them.
I know, right?
So much texture.
So much texture and color.
So starting in the spring, peonies.
I love peonies.
Yeah, so of course, you don't see the flower now, but that will be blooming.
And then I kind of picked plants that are going to transition into each other.
Like, they might not go at the same time, but there's always going to be something blooming.
This one's called Salvia.
OK.
It's gonna be a purple-spiked flower.
It usually starts about May.
This is Liriope.
It's called lily turf.
But that typically starts blooming in June/July.
It depends where you are.
OK. Um, so, let's see.
I love the texture of those guys.
I know.
And, OK, this is a type of sedum called Dragon's Blood.
It's going to stay low, and it'll be along, like, the pathway.
OK.
So it'll kind of guide you in.
Does it spread or mound?
It'll spread and mound.
OK. And it's a mounding spreader.
OK.
I'll take it.
And then it'll have pink flowers in June.
Oh, beautiful.
So we got a couple of those.
And then these are called coneflowers.
Love the color on those.
And there are so many different varieties now, so it's called echinacea, coneflowers.
So, these are going to be summer bloomers, and they'll go into, like, early fall.
Yeah!
Let's see.
We have the Leucanthemum, otherwise known as white... Shasta daisies?
You know this one?
I do.
It's a great flower...
It is beautiful.
Yeah.
It'll add a pop of white.
And then also to go right after that, we have Anemones.
Oh, I love these.
They're so dainty.
So beautiful.
Even before they open up, they're just gorgeous.
This is a fall bloomer.
So it indicates going back to school.
You know, it's just kind of that time of year, so, but it'll open up to this beautiful pink flower, and they are gorgeous plants.
They're dainty and lovely.
Mm-hmm.
And then this one is a little Limelight Hydrangea.
The normal Limelights get eight to ten feet tall.
This is a little Limelight, so it'll start and it'll get up to three to four feet.
OK.
So I was thinking for the layering, we could do this shrub, and then for your structure in the winter, I bought dwarf boxwoods.
These are green velvet boxwoods.
They're a relatively low grower.
So I was thinking, these along the foundation and these in the front.
And as those go dormant, this will be your structure in front of that.
OK. Great!
And then for the other side of the walkway, I was thinking this maiden grass.
You know, just two of them.
They get pretty tall.
But just the texture, the height.
Wispy and lots of movement.
So I like that.
Yes, movement in the garden is important.
If you approve, let's get planting.
Heather: Yes!
I wholeheartedly approve.
OK, awesome.
What we're going to do is remove all the grass.
Heather: Very dry.
Very, very dry.
Well, if you didn't know we were in a drought before this, you know now.
Seriously.
The Earth is so dry.
[Sighs] Jenn: So when we get down to the soil, we're going to add some compost.
Now, what exactly is in compost, Jenn?
Because it has a little bit of an odor.
Jenn: Compost can be anything from your food waste broken down to this--I think this is composted manure, is what we picked up today.
So for new plantings, you're going to need organic matter to help them thrive.
♪ And so see these roots?
We just want to, like, gently, yeah.
Just... not so it falls apart but, like, so it can reach out into the soil.
That's perfect.
All right.
That looks like a good height to me.
I have a little fertilizer.
All right?
Yeah, just mix it in a little bit.
They look more natural if you plant them in a zigzag rather than a straight line.
♪ Well, look at that.
It's a beauty.
I thought you needed a little scale here, so I got you a tupelo tree.
It's a native tree.
Really, the show with it is not a flower, it's the fall foliage.
And it's not going to disturb your sun garden because the shadows will be cast a different way.
Got the mulch.
Just don't bury the perennials.
Keep it off the base.
OK. ♪ Hey, Heather.
Hey.
I'm glad to see you're watering.
Yes!
All right.
So I think we've accomplished what you wrote in about.
I mean, what do you think about the space?
It's amazing.
It's really magnificent.
I love the color palette and the seasonal color we're going to get.
I think it's going to make a real difference.
Yeah, you just have to keep it alive.
I'm going to try.
Water every day for the next two weeks.
You know, you could just spot water like that.
You're not going to waste it.
And then scale back to every other day, and then I think you're going to be good.
Set up until the fall.
OK?
OK, awesome.
Thank you so much.
You're welcome.
♪ Hey, Mark.
Hey, Kevin.
So even masons have got spring cleaning duties, huh?
That's true.
So, your hardscape gets abused in the winter, as we all know.
Yeah.
The salts, the contaminants, even natural products, such as a leaf.
Is that what's caused this discoloration here?
Yep.
So this is a piece of limestone.
Once a leaf drops down, it disintegrates, and that's what you're left with.
And then the black discolorization on...?
This is a piece of bluestone, and this black stuff that you see right here is actually mildew.
So very typical on bluestone.
But we can clean that.
OK, green on the front of the stone right here.
It's an algae, which is harmless.
But, again, it's something that we would want to clean and get off.
Gotcha.
Brick.
You've put a lot of this stuff up for us.
Yeah.
This, again, is a multiple of stains.
There's some masonry runoff right here.
This is something we can clean as well.
So different materials, different offenses here.
Yep.
Your recommendations for cleaning?
Right.
So back in the day, you actually had some of the cleaners in your cabinets at home.
This is vinegar.
Mm-hmm... That's baking soda, right?
Effective?
Very effective, very effective.
But we've evolved since then.
And the evolution has pushed us forward into cleaners such as this.
This bottle actually is good for the limestone.
That's going to go on that one.
Right.
And this bottle here will take out rust.
And those are homeowner-friendly.
Homeowner-friendly.
All right.
You ready to clean?
I am.
All right.
All right.
All right, Kevin.
So, to get started, let's grab that limestone.
There's your limestone, sir.
We have to pre-wet.
If we don't... Why do you pre-wet?
If we don't pre-wet, as soon as this material makes contact with the limestone, it's gonna sizzle, and it's going to burn the limestone.
Oh.
So we want to lessen that effect... Gotcha.
by just getting it wet.
Do I spray it down with a hose?
It's just regular water?
You can definitely spray it down with a hose.
That would be great because as you can see, the water does get sucked into the limestone, so that's why I'm going to be generous.
So you are gloved up.
Not any ordinary gloves, though, right... No.
This is actually a Neoprene finish on the glove that does not burn on the material.
So that's why I'm using this.
And glasses, obviously.
My glasses.
Look at this.
Now, I'm talking about the solution here.
This is the solution.
So all the solution is is a chemical reaction with the stain.
Kevin: Whoa, baby!
Look at that.
Right there, so, and you can see the material, or the stain, I should say, being pulled out of the stone.
See the brown on top?
Yeah, yeah.
That's being pulled out.
So, and I'm using a stiff bristle brush.
And as you can see, Kevin, I'm letting the material do the work.
So this is not so much about scrubbing at this point.
This is more about the, as you say, the material doing the cleaning.
Exactly.
So I'll even let it sit for a minute.
Not too long because, again, I don't want it to damage the limestone itself.
But this is actually going just the way I want it.
Going to rinse.
And, of course, I'm going to use a clean brush.
Oh, yeah.
Look at that.
It comes out pretty well.
Still some there, but most of it's gone.
Yep.
So all I would do at that point is just rinse and repeat.
Back and forth.
Yep.
Go back and forth.
Why don't we try that bluestone?
And, again, I just want to get it wet.
Bring it over to our other bucket.
Now, what people don't know is bluestone is actually resistant to the muriatic acid that may be in this detergent.
So what you will see is this detergent attacking.
So all that is a stain, and you can see that chemical reaction.
So it's reacting with the mildew, not the stone.
Exactly, exactly.
So it does tell you that it's working.
Yes, but it's much different than the limestone because the limestone, again, is a softer material.
It's more porous.
Right.
Kevin: Let's see how we did with the cleanup here.
Oh, yeah.
See that?
Right back to the blue.
Right.
That's gonna give you a fresh, new-looking patio out of bluestone.
You can tell already that mildew's gone.
Yep.
Love it.
Absolutely love it.
All right.
Beautiful.
Well, I appreciate the lessons, Mark.
Looks good.
Thank you.
All right, Kevin.
Hey.
Dan?
Hey, Tommy.
How's it going?
It's going well.
How about you?
Good.
Love this foyer, this front entryway.
Thank you.
The sun's facing in and heats it up nicely in the wintertime.
Absolutely.
Oh, look at this.
Beautiful front door right here, two sidelights.
This is a wide door.
It's gone.
Did you take it out?
No.
The previous owners did.
I hope you still have that door.
We do.
It's in the basement.
Yeah.
Don't get rid of that.
Yep.
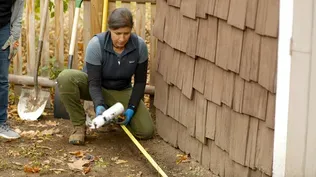
So these are the floors you wrote me about.
Yes.
Tom: Beautiful.
Look like parquet.
And I see the patches-- heh!--that you were talking about also.
Yeah, definitely.
So when the previous owners converted everything over from the old radiators to baseboard heat, where the pipes came up previously, they left us with these nice holes.
Yeah, I can see where they patched it right here with these metal plates.
Well, it's not uncommon for them to patch them with metal, but these are relatively easy to replace because they're individual pieces, they're face nailed.
Sure.
So you can take a piece out, cut a new piece in, and it'll blend right in nicely.
Well, we've got a different situation upstairs that I'd like you to look at.
Oh, really?
All right.
Lead the way.
Great.
So my wife and I just had a baby.
Well, congratulations.
Thanks.
And that's why we wrote to you.
We're trying to childproof, and holes in the floor and baby don't really mix.
Well, that makes sense.
Thanks.
And her room's right here.
OK. Oh, this is wonderful.
Thanks.
Oh, yeah.
Two radiator holes right here in the corner.
That's usually where they would stick the radiator.
Yep.
OK.
So, first of all, I look at these floors, they're definitely different from downstairs.
These are probably white pine, which, it looks like, 1-by-5.
And they don't look like their tongue and groove.
Square edge and face nails with cut nails.
Dan: OK.
So we could do this a couple of different ways.
We could actually cut a piece out... OK. and then drop in what is called a dutchman here and then another one down there, all right?
Now, you've got dutchmen along the place.
I see that someone patched a hole right there.
Sure.
So we could cut this out for the dutchman there and another one right here, or we could cut this straight across here, remove the boards, install one, and make it look like two.
That's not bad.
What do you suggest?
I think we should cut it out, and you'll have some wood to patch and some other holes because I think you got a few, right?
Yep.
Sounds good to me.
All right.
So let's get some tools, and we can get started.
Perfect.
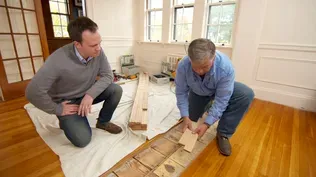
All right, Dan, you wanted an old piece of wood, and I've got one right here.
Cool.
Now I probably took this out of a job, maybe 20 years ago, and I saved it at my house along with some others because I love working with these old boards, but you can see that this was a subfloor right here, some type of a felt paper or paper right here with a--with a finished floor over it.
OK?
But we want--I know you don't want that to look like that.
But when you sand these boards up, And look at how beautiful that is.
Wow!
Awesome.
The grain of that wood is absolutely gorgeous.
So, you see the grain of the wood here and how this darkens right here?
Sure.
So I'm thinking because there was a radiator in the corner-- Mm-hmm.
All right?
And we're gonna cut this board to length and put this down on the floor.
We'll cut the width.
This will actually basically say that over time, there was a radiator there, and it stained the floor or whatever, you know, but I just like little things like that.
Sounds great.
So, why don't we cut it to rough length, and then we'll rip the width and cut it to its exact length?
Because I want to cut the patch before we cut the hole.
OK. All right?
Square that edge off there.
Sure.
And then when I give you the length, we're gonna cut a rough length here.
So, have you used a crosscut saw like this before?
Uh, lightly, yeah.
OK. Well, again, the lesson is always keep it tight against the fence, always hold it down, and keep this hand away from the blade.
Sure.
And then just fire the blade up.
Once it's fired up, you're gonna pull it out.
You're gonna push down and then push forward at the same time.
[Buzzing] OK.
Perfect.
All right.
So, now we have a piece that's smaller, and we can actually handle it better.
We're gonna rip it down to 9 1/4.
[Buzzing] Perfect.
All right.
You ready to use the table saw?
I think so.
All right.
I'm gonna give you a quick lesson here.
I want you to make sure you stand from the side of the blade over.
You're gonna put light pressure here, and you're gonna watch this gap all the way down.
See, if it's like that or like that, you're not holding the board straight and parallel.
And you're just gonna put light pressure through.
This hand's gonna stop right here.
Tom: Board's gonna slide through your fingers.
You're gonna keep pushing it.
I'm gonna be on the other side to help you.
When you get so far over here, then you're gonna stop, you're gonna grab this, put it on top, and slide the board.
OK. All right?
[Shuts off saw] All right.
There's our patch that we've cut.
We're going to put it in, but I want to do one more thing.
I wanted to make it look like it's 2 boards.
OK. Tom: I want to set my rip fence so that the space is 4 1/2 inches on this side of the blade.
That gives me the width of the piece that we want to match.
Great.
I also want to make sure that this dark section right here goes in the corner, so this side of the board is gonna go against the rip fence.
OK. OK. Tom: So hold the board, light pressure, pushing it right through as you go.
OK. Let it slide through your hand easy.
[Buzzing] Move this away from this just a little bit.
[Turns off saw] Now we have two boards that will match upstairs.
Cool.
All right?
Let's take it up.
All right, Dan, let's see how it fits.
Or should I say let's see how it looks?
Ha ha!
It's not ready to be put in yet.
OK. Slide it into the corner.
Looks pretty good.
Yeah.
I have a gap here, just like it was before.
Perfect.
And our joint lines up so it looks like 2 boards.
Yeah.
[Sawing] This is an oscillating saw, and you're gonna use the board as a straight edge or a guide.
Gonna go down straight, and you just want to do a light cut all the way down and straight as possible.
OK. Once you get in about 1/8th of an inch, we're gonna take the board away, and then I'm gonna have you go down straight.
OK. [Wood cracking] Now we can work on removing the boards by using a hammer and a pry bar.
So, I'm gonna take these cut nails.
I'm gonna save them.
You know why?
'Cause we'll reuse them?
Well, that, too, but the real reason is, I'm too cheap to buy new ones.
Ha ha ha!
Know what I mean?
Sure.
[Buzzing] It's perfect, and it looks pretty good.
What do you think?
Yeah, it looks pretty good to me.
Yep.
All right, so we can nail it with the original cut nails.
OK. Now, we're gonna line these nails up with the nails that are already on the floor right here.
Try to hit that as flat as you can.
This part here as flat as it can be there.
So you adjust that this way.
Sure.
OK?
Like that.
[Tap] Good.
Hit it again.
Hit it like you hate it.
[Taps harder] There you go!
My gosh.
That was beautiful.
Sweet.
Now we'll give the boards a light sanding.
[Sander humming] This is a satin finish, and so you have to really stir it quite a bit, and you also want to make sure you stir it slowly so you don't create bubbles, 'cause the bubbles will transfer onto the finish.
All right, so you've got that stirred up really nice.
You didn't get any bubbles.
That's all good.
So, now we're ready to apply the first coat.
OK. OK, so you're gonna use a foam brush, and you're gonna apply it nice and slowly because you don't want to-- you don't want to create bubbles by doing it really fast.
Sure.
OK. And this will be your first or primer coat.
OK. OK?
So, start in the corner, work your way out.
All right.
Drag it right over.
That old wood just sucks that finish right in.
Yeah, it seems like it's already kind of-- Yep, now you see how the tone is gonna blend right in with the old there?
It does, yeah.
I see what we're doing.
Always try to get a wet-on-wet edge.
So, you know, get a nice even finish that way... even though this is still your first coat.
Yep.
The next coat, you get better at it.
And the next coat, you'll be really good at it.
Yeah, I'll be an expert.
And then the coat after that, you can refinish all the floors 'cause you got so good at it.
By hand, yeah.
Yeah.
Yeah, by hand.
[Chuckles] All right, Dan, I think it looks pretty good.
What do you think?
Wow.
Looks awesome.
Blends right in nicely?
I think so.
And the holes are gone.
Yeah, absolutely.
All right, so you have some homework here.
I want you to sand it after 24 hours lightly with some 220-- 180- or 220-grit paper.
Wrap it around a sanding block, or you can get a little pad and sand it with the grain, really lightly, and then wipe all the sawdust off with a damp rag.
OK. Give it another coat, wait another 24 hours, light sanding, and then your top coat.
Perfect.
After that's dry, I want you to take a dark pen and color in that groove that we made to match the lines of the floor so it'll be nice and dark.
Sounds good.
You can handle that?
I think so.
All right.
Well, you got your work cut for you.
I think you can do it.
Thank you so much.
My pleasure.
Appreciate it.
So if you've got any projects around your house and you need a hand, let us know.
So until next time, I'm Tom Silva for "Ask This Old House."
♪ Kevin: Next time on "Ask This Old House," Richard will do a deep dive to learn why this bathtub runs cold.
Then the paint job is over.
Now what?
Mauro will walk you through the process.
And on "Build it," Tom and I toss around some ideas and come up with a project that the whole team can enjoy.
[Cheering] Nothing but net!
Kevin: All that on "Ask This Old House."


Support for PBS provided by:
Funding for THIS OLD HOUSE is provided by The Home Depot and Renewal By Andersen.