Painting with Wilson Bickford
Wilson Bickford “North Pasture Gate” Part 2
Season 6 Episode 9 | 26m 19sVideo has Closed Captions
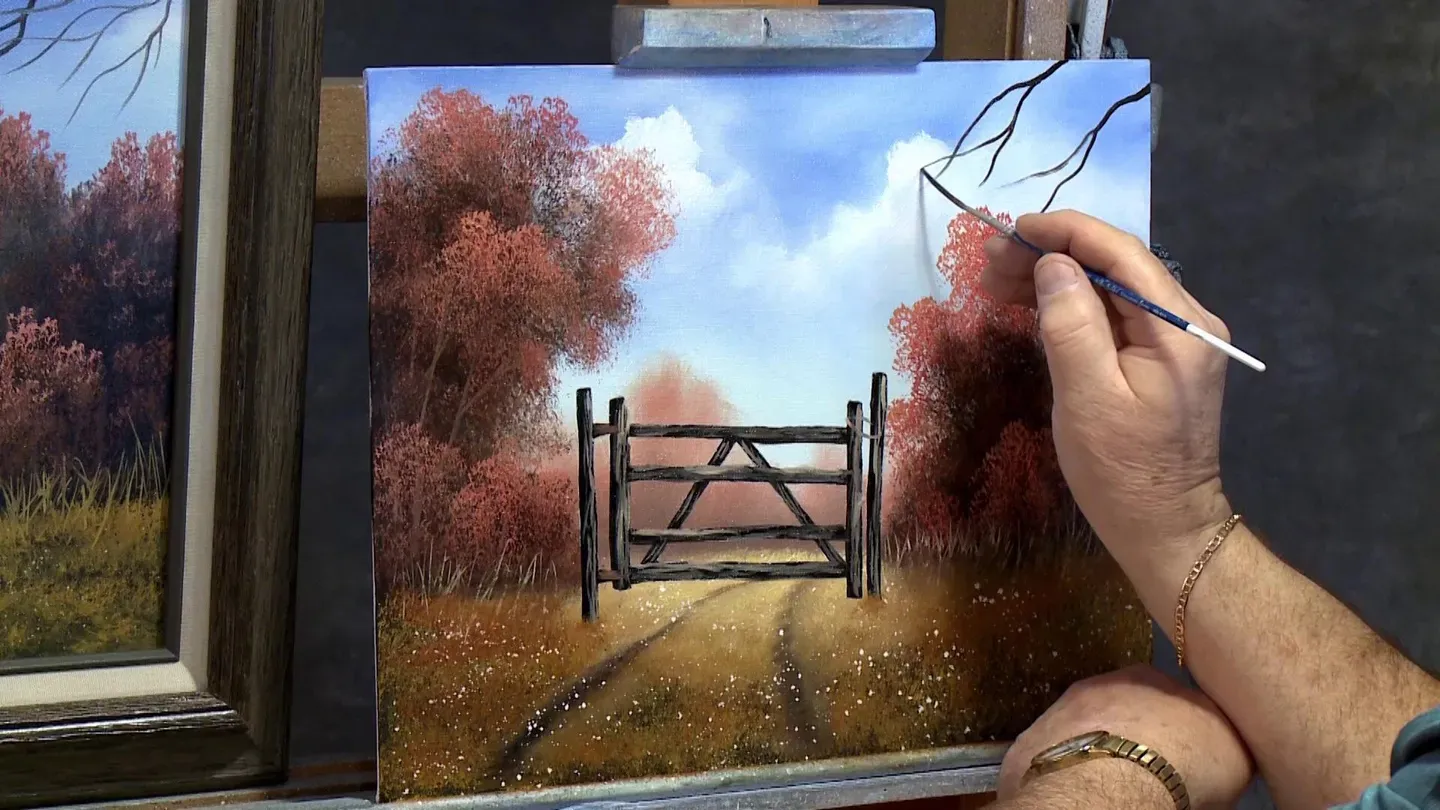
In part 2, it’s time to complete all the details of the "North Pasture Gate"
It’s a beautiful autumn day, so let’s take a hike through the meadow down to the pond. We’ll have to pass through the “North Pasture Gate” along the way. In part 2, it’s time to complete all the details.
Problems playing video? | Closed Captioning Feedback
Problems playing video? | Closed Captioning Feedback
Painting with Wilson Bickford is a local public television program presented by WPBS
Sponsored by: St. Lawrence County &nbps; &nbps; The Daylight Company &nbps; &nbps; J.M. McDonald Foundation
Painting with Wilson Bickford
Wilson Bickford “North Pasture Gate” Part 2
Season 6 Episode 9 | 26m 19sVideo has Closed Captions
It’s a beautiful autumn day, so let’s take a hike through the meadow down to the pond. We’ll have to pass through the “North Pasture Gate” along the way. In part 2, it’s time to complete all the details.
Problems playing video? | Closed Captioning Feedback
Where to Watch Painting with Wilson Bickford
Painting with Wilson Bickford is available to stream on pbs.org and the PBS app.
- As you'll recall in part one of this painting, we developed the sky and the background trees.
Now we'll move ahead and put the details on the north pasture gate.
Join me next on "Painting With Wilson Bickford."
(upbeat music) Hi, I'm Wilson Bickford.
As you'll recall in the last episode, we started this north pasture gate project and we got it up to this point.
We had dropped in the background, sky, the background trees.
We're working on some of the foreground trees, now we're gonna get up here where we're gonna start showing the detail on this nice, old, rustic, wooden gate.
So where we left off, we had brought the trees up to this point.
We got the metal starting to come through forward.
I'm gonna continue that with my fan brush, pick up where I left off.
I'm gonna go a little bit lighter here.
I wanna make sure I got some nice light value right in underneath this gate so it really stands out against the darkness of the gate.
Make it look like a little bit of sunshine back there.
I hope you're enjoying this lesson.
I try to mix it up on mine, I do some summer scenes.
I do some winter scenes.
This one's a nice autumn scene.
I live in Northern New York, so I get all of the seasons.
So, I kinda know what snow and autumn trees look like.
I live in a beautiful part of the country, and I enjoy every minute of it.
For an artist like me it doesn't get any better.
So I'm going a little bit brighter right in through here.
And then I wanna get a little bit darker, a little more hay color, a little more golden rod color, I guess I would say.
I'm gonna use the large 1 1/2 inch texture brush.
And this is to invite you into that meadow.
Notice it's lighter here, darker here.
That wasn't an accident, that's a compositional thing where I was considering how the viewer's gonna scrutinize this.
You wanna bring your viewer into your painting.
I'm gonna take yellow ochre, maybe a little bit of this yellow, cadmium yellow, mostly ochre.
And see if I tap the brush and really open the bristles up and spread them out, I can come in and just tap and get a nice texture.
Notice I'm letting a little bit of that black show through there, let that black do its job.
That's why I underpainted it with black.
That's all of the shadows within the grass.
I wanna marry it into that previous yellow, so it's just kind of a gradual transition.
Lighter glow here getting darker as it comes out.
I'll see how this pans out.
There's nothing saying that I can't add a little bit of burnt sienna to really darken in here a little more if I choose to, and I very well may.
We're gonna see how it pans out here.
So I'm just doin' little taps, kinda downward and let the bristles spread out.
And see how it just kinda is really nice for giving you grass texture?
You know you can do this, I know it.
You should know it, believe in yourself.
I have so many people tell me, "Oh, you're so lucky because you can paint.
"I could never do that."
The reason you can't do it is you don't believe in yourself.
If you believe in yourself, you can do anything.
I'm a firm believer of that.
All right, you see I've got a nice little glow established there, I think I need to build that up a little more, so I will.
I'll come back, but right now as long I got this color going I'm gonna take more ochre and this time I'm gonna put just a little bit of burnt sienna in it.
And I'm in no way trying to match this one exactly.
I'm showing you exactly what I did to achieve that one.
Every painting's gonna come out a little different.
So I'm just goin' with what I feel here, but I want it a little darker, away from that glow.
And I'm gonna come back and brighten the glow.
So I'm gonna but a little sienna in there.
See how it darkens it down a little bit?
It's gonna more force the viewer's eye into that section back there.
You wanna lead the viewer to that gate and through it.
It's all about your contrast.
See how it looks like it's getting lighter?
It's really not 'cause I haven't put a lighter color there yet, but by darkening the outside edges, it makes that appear lighter.
It's an optical illusion.
But I am gonna go back and just really jazz that up a little more.
I'm gonna use my fan brush 'cause I've already got some of this yellow on it, the brighter yellow.
I will take titanium white and some of the cad yellow pale.
Just like I did before.
And I just really wanna go a little extra bright right here.
So I'm gonna put just a little bit of fuzz above that bottom rail, that'll show through there.
I just barely got some there.
I'm gonna play that up a little bit on this one.
I think it'll make a nicer effect where you're actually seeing some of that grass right over the top.
See, don't you wanna walk right through that opening?
Look at that, you can't look at that painting without your eye going right to that spot.
That's not a mistake guys.
I'm planning that out in the composition.
A lot of people start out and composition is the last thing they consider and that's okay, as long as you catch up and you study it and you learn about it.
Everybody wants to learn the technique of how to paint a tree, or paint a cloud, or paint a barn, or whatever.
And they let composition sit by the wayside.
And they don't discover til later on that boy, "I should be really planning where I put stuff."
But it's one of those things.
Composition is the most important part of a painting, in my opinion.
It's like building a house.
If you have a weak foundation, the whole house is gonna suffer for it.
If you have a bad composition on your canvas, your whole painting's gonna suffer for it.
Just my opinion, but...
Always think of your composition.
It'll be worth it in the end.
Okay, now before I take the tape off that gate, I wanna put some spatter in here.
The gate is pretty much almost the last thing we're gonna do.
I've gotta add a tree in here.
I might come back and even work on these trees and jazz those up a little bit.
I have a lot of different options.
But I'm gonna take my number 10 flat brush.
And I want something dark so it looks like you got vehicle tracks.
Maybe somebody drove an old truck through there, or something at one point.
Had to go out and feed the cows, who knows?
I've got some of this nice dark color that was left from my trees earlier on.
I can probably use that.
If it's too dark, you could put a little bit of this ochre mixture with it that you had.
Just something to tone it down.
You just want something a little bit darker for the hay color in the grass.
And I'm gonna hold the brush horizontally and I'm just gonna wiggle and jiggle.
I'm gonna press lighter here and heavier out here so the track widens out as it comes closer.
That has to do with linear perspective.
So I'm gonna let it go, I can see my tape right there.
I'm on my tape, I'm going right on that.
Like it's gonna go out beyond and around the corner.
So I want it skinny and then I'm gonna press down harder.
You'll see that it gets wider, just like a track would.
That's what it would look like.
In reality, it's gonna look bigger the closer it is to you.
I might have to darken that color down a bit.
See how it gets in here and it's getting lost?
So I'm gonna add a little bit of black just to darken that down a little more.
Just a matter of the contrast and the value.
Make sure it's gonna show up.
That looks really harsh, but we're gonna soften it.
This one is gonna be very close to that one, but it's gonna swing around this way.
And again, let it get wider.
And it needs to go darker, let it get darker.
Like I said, for a track through grass and hay, that looks very harsh, we're gonna soften it.
See, that's gonna go right underneath that bar right there.
Okay, to soften it I'm simply gonna take a fan brush.
This one happens to be clean.
And if I just kinda tap the edges, I'm kinda softening the edge of that dark brown into the grass color.
If you achieve a softer edge, it automatically makes it look like it's sitting in grass and not just drawn over the top.
You'll notice I keep wiping the brush off because you're gonna pick up paint as you do this.
I wanna be blending, not painting.
You've probably heard me say before, if there's paint on your brush, you're painting.
If there's not, you're blending.
At this point I wanna be blending.
So if you pick up too much paint, keep wiping it off.
You see how that softens those?
And just about right.
They look pretty good now.
All right, that was easy, wasn't it?
That was nowhere near as hard as you thought it was gonna be, right?
Okay, I do have some texture down here.
I've got some little white spatters.
You could use a color, if you had some purple.
Orange, I could use some of my orangy color here if I wanted to.
Just anything that was a little wildflower color or texture.
I got some little white spatters in here that look pretty good.
I'm gonna stick with the white, but any color would go.
I'm gonna use some of the white base coat on a clean fan brush.
I'm gonna get a little bit of thinner.
I've got a couple drops of my odorless mineral spirits here to thin it down just enough.
And if you watch my palette here, I'll show you how this works.
This is called spattering.
If you watch this dark spot.
I'm gonna pull the bristles back and let 'em fling forward and it sprays this little random speckle of dots.
That's how I do stars in a nighttime sky.
It's how I do falling snowflakes.
It's how I do little flowers in a meadow like this.
Just release a few bristles at a time.
And you're gonna have to be the judge of when enough is enough.
I want some in there, but I don't wanna go too crazy with it.
Now those could be little white daisies.
They could be Queen Anne's lace, you know, depending on the color that you use that says something different to the viewer.
If you did purple ones, they could be little violets or forget-me-nots.
I did get a couple of stray speckles up in here.
You can probably just barely see.
Do I look scared?
Nah, I'm not scared.
I can fix that easily.
So if that happens, you just use a clean fan brush, dry it off, if I come in and I just touch those, they melt right in, they disappear.
They're very thin so they soak right into your background paint, you just touch 'em, they're gone.
Nothing to it.
Okay, from there I'm gonna take my long script liner that I used earlier on the first episode with the tree limbs and the branches.
I'm gonna pull some grasses up here just to give it a little more definition.
I know, and you're sayin', "When are you gonna get to that gate?
"I wanna see you do that gate."
We're gettin' there guys.
All in good time.
I'm gonna take some of this yellow that I just used in the meadow.
A little bit of base coat just to thin it down a little more.
I'm definitely gonna have to add thinner, paint thinner, to my brush here.
Get your paint nice and thin just like we did when we did the tree limbs.
With a light touch, and this'll just give me a little definition against those trees.
Some grasses, and reeds, and weeds, and stuff standing up.
Again, just like anything we do with the painting, it depends on how much of this you want.
Or if you want any, I could've left it the way it was.
This just gives it a little more definition.
A little more detail.
At the bottom, if they look like they just start out of nowhere 'cause they literally are.
See, I'm just starting here and they're all very flat on the bottom.
I can go back with that clean fan brush.
And if I just tap in the base of 'em a little bit, it softens 'em in, makes 'em look like they're anchored in and connected, not just painted over the top.
Just using the corner, just enough to do the job.
Don't pounce it to death.
You see, that just gives it a little more definition, a little more detail.
As things get closer, as everything gets closer, you need more detail and definition in it.
See how that treeline in the background looks like it's a million miles away?
That was the whole point.
I wanna leave it very vague like that.
That's it, I'm just gonna soften these a little bit overall just enough so they're not so liny and rigid.
Okay, and from there, I'm gonna take this tape off.
Now you can use your sharp knife that you use to cut out with, this'll work.
You get under here and get it started.
I should have a black gate under here.
Remember, I painted this with black acrylic underneath.
I do have a little bleed-through underneath on a couple spots, that's fine, I'll touch that up.
The sharp knife works.
If you happen to have a small painting knife, this one was not on the supply list, but if you happen to have one kickin' around.
This one's a little safer.
And it's pretty good for diggin' underneath this tape and gettin' this off.
So I'm gonna remove all this tape and we'll come back and put a nice thin coat of clear medium on this fence.
And then we will continue.
I'll see you in just a minute.
(upbeat music) This is a similar theme to what we just painted today.
However, this is more of an overcast summery or spring scene.
This is one that I teach in my classes.
Same kind of idea with the gate.
I approached it the same way.
I underpainted with the black, taped it out.
I did just more of a gray overcast sky, a little barn in the distance.
This other side that the post that was here holding the gate at one point got tired and fell over.
Just make it your own, dream up a new story with it and have fun.
I removed all the masking tape and I applied a thin coat of clear glazing medium to this whole area, the black acrylic area of the gate.
And I'm just touching up, you might have a few little raggedy edges around here with the... Where the white base coat may have seeped under your tape.
It totally depends on the quality of your tape and how well you had it burnished down, how aggressive you were brushing over it with your other colors.
You're probably gonna have a few little indiscrepancies there, they're very easy to touch up, no big deal.
So I'm touchin' those up like this.
And then I wanna put light on this gate.
It's wood so I wanna work in a fashion that kind of suggests wood grain.
So I'm gonna do long lines that go with the length of the boards and the planks that are being used.
So I'm gonna, I've switched this brush out now of the black, I'm gonna take white base coat.
A little bit of burnt sienna.
Now you can go grayer or you can go browner for a weathered gray look for like barn board, barn board, barn wood gray.
Weathered gray you'd wanna use black and white like this.
Sometimes I flavor it with a little bit of sienna so it's kind of gray, but it's kind of a brownish-gray.
It's all good, it's totally your choice.
As you know, everything with a painting is personal preference.
This is the detail script liner and I'm gonna roll this to a point, this is kind of grayish, which is fine.
Which is similar to what that one is.
The light in this painting is coming from the right.
So I'm just gonna work down the length of this like this.
You'll see the gate actually comes together pretty easily from this point.
You just wanna get that wood grain feel, so notice I'm just doing dashed lines.
As it goes around to the backside, I try to let it stay a little darker.
I let some more of the black show, so it looks like it's shadowy.
Eventually I'm gonna have to bury in the bottoms of the posts where they're anchored in the ground.
Right now, they're just sawed-off very straight, which looks kind of odd, but I'll mingle those into the ground.
This one's gonna get the same treatment.
All the verticals, there's four vertical lines there.
All these are just gettin' the same treatment right on the right-hand side of them.
Leave some of the black showing through.
Normally I go through and I do all of this, and then I come back and I re-highlight.
I can really give it lots of extra snap.
Now see, these two are elevated off the ground.
These, the two outermost ones are in the ground.
So see, notice these are above?
Not to say you couldn't put some grass up above it, up to it, but you don't really need to.
The two outermost ones are the ones that are anchored in the ground that we have to be more concerned with.
So we'll bury those in.
See, this little bit of detail just really brings out the light, see how it's comin'?
It needs to be lighter.
I'm gonna accent it, put some lighter highlights on.
Notice that the cross pieces are in behind.
So I'm gonna come in here like this and just kinda piece 'em in between the horizontal ones.
They're sitting on the backside.
I'm kinda rushing here 'cause my clock is counting down, but you'll have a lot of time at home to work on this and embellish it the way you want it.
I love doing these old farm scenes.
It's just something that I've grown up seeing all my life around my neck of the woods, so...
So I'm gonna do all these, and then I'm gonna come back and accent.
Which means I'm gonna go a little lighter and a little brighter, really make it pop.
This is not difficult, this stage right here.
It's just a little more time-consuming.
Don't let me forget the hinges.
I got rusty hinges on here too.
Rusty Hinges, he sounds like a contractor.
Sounds like he'd build you something, doesn't he?
Yeah, I had remodeling done on my house.
It was done by Rusty Hinges.
(laughing) Okay, I'm going to swish that brush out.
And I'm gonna take more of the gray, just like I had.
I'm gonna add a little more sienna to it, brighten it and lighten it just a little bit.
And here and there, don't do it everywhere.
I'm gonna go a little bit lighter than that even.
Here and there, I give it a little extra snap.
You'll see that it really sets it off and it kind looks like the light is coming through between trees and stuff.
And hittin' a little brighter here, a little lighter there.
It takes the sameness out of it.
See that?
It's subtle.
I'm gonna dip in some more thinner.
I can even put a little bit of yellow with that.
Just a touch, brighten it up a little bit, so it looks like you're gettin' a little sunshine on it.
So you'll have a lot of time to embellish that.
Okay, I'm gonna swish this out.
And I'm gonna take some of that burnt sienna and black.
Something looks a little rusty.
These are those big old iron strap hinges on there.
Take burnt sienna, speck of black.
Keep it just rusty enough were it's gonna show up.
And then put some of that rust color.
I'm gonna put just a speck of white with that so it shows up a little easier for ya.
Something that looks a little rusty.
All right, at the base of that, I'm gonna take a little bit of my grassy color, and just anchor these in a tad.
These outermost posts.
I see that I've got a little spot here where I dragged this down, see this little booboo right here?
I dragged my wood color down.
I'm just gonna saw that off.
You guys saw that, didn't ya?
Tallahassee, Florida, somebody saw that.
You were watchin', you said, "I hope he fixes that."
I just did.
Okay, I have a little bit of a rope around here just to hold the gate shut.
I can take any of this grayish stuff and just wrap that around where they shut the gate and loop the rope over it.
I got that tree limb hanging in.
For that, I would use my long script liner, like I used for my grasses and my tree limbs before.
I just need something really dark, which means I will take black with burnt sienna.
Remember when you're using this brush, just like before, you have to really thin your color down.
My paint is really thin and the brush is really well-loaded.
And this is optional, it just gives me another layer and a little more depth.
I think it adds something to it.
You got a dead old tree.
It's like there's a trunk over here and you've just got some of the limbs hanging inward.
Just kinda makes it more interesting, I think.
So I hope you give this one a shot.
I've had fun bringin' it to ya, for sure.
I always like to try something different for you folks.
This one's a nice autumn scene.
I like to do different seasons, different themes.
There's not too much in this world that I don't like to paint.
And see when I'm being quiet right there, I'm holding my breath to steady my hand.
But add some limbs in here if you choose.
See how that adds another layer of depth to it?
Give it a try, send me a copy.
I'd love to see your version of it.
Until next time, stay creative and keep painting.
(upbeat music) - [Announcer] All 13 episodes of "Painting with Wilson Bickford: Series Six" are now available on DVD or Blu-Ray in one box set for $35 plus $4.95 shipping and handling.
Or learn the techniques used to paint "Stand of Birches" with the in-depth "Paint Smart, Not Hard" series of Wilson Bickford instructional DVDs.
Additional titles available.
Order online or watch or download directly to your computer or mobile device.
More information at www.wpbstv.org/painting.
(upbeat music)


- Home and How To

Hit the road in a classic car for a tour through Great Britain with two antiques experts.
 New Season





 New Episode
 New Episode



Support for PBS provided by:
Painting with Wilson Bickford is a local public television program presented by WPBS
Sponsored by: St. Lawrence County &nbps; &nbps; The Daylight Company &nbps; &nbps; J.M. McDonald Foundation